AssistantTools.com web site Ÿ Download Mp3 Tag Assistant Ÿ Buy Mp3 Tag Assistant
In Batch Mode of Mp3 Tag Assistant you should do the following operations to be able to edit music file tags and perform other operations:
| · | Create the Selection List.
|
| · | Edit the Selection List (this can be skipped).
|
| · | Edit tags, rename files, create playlist and etc.
|
These operations are specified in this figure by red arrows:
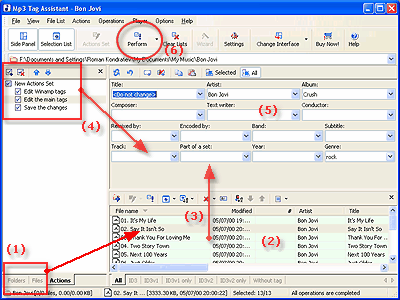
To each operation correspond:
| · | Operation "Create the Selection List" - the red arrows (1).
|
| · | Operation "Edit the Selection List" - a number (2).
|
| · | Operation "Create the Action List" - a red arrow (4).
|
| · | Operations "Edit tags, rename files, create playlist and etc." - a number (5).
|
| · | Operation "Perform the Actions" - a red circle (6).
|
Adding files to the Selection List for editing
| The first thing you should do is to add to the Selection List the files that you are going to edit. The Selection List contains files that will be exposed to the Actions changing information in mp3 files.
|
| There are several ways to add files to the Selection List:
|
| · | Method #1 – adding the contents of a folder. Select the folder files from which you want to add and press the "Add all files to Selection List" button ( ) on the Folder Panel toolbar. ) on the Folder Panel toolbar.
|
| · | Method #2 – adding separate files. Select the necessary files from the selected folder at the File Panel and press the "Add selected items to Selection List" button ( ) on the File Panel toolbar to add these files to the Selection List. Double-clicking the left mouse button will also add the selected file to the Selection List. ) on the File Panel toolbar to add these files to the Selection List. Double-clicking the left mouse button will also add the selected file to the Selection List.
|
| · | Method #3 – adding all the files from the specified folder. Press the "Select the folder to be added" button ( ) on the Selection List toolbar. ) on the Selection List toolbar.
|
|
 Tips: Tips:
|
1. You can add files from various folders to the Selection List.
|
2. It is possible to add the files with subfolders. Open the menu of the "Add all files to Selection List" button and will choose "Add with subfolders" item.
|
|
Editing items in the Selection List
| After you add the necessary files to the Selection List, you can edit this list.
|
| All Actions in the Action List are applied to the items in the Selection List taking into account how the latter is sorted. There are various ways to sort items in the Selection List, including sorting by filename and by all tags.
|
| There is also a mode for Manual Sorting in the program. Toggling the mode is done by pressing the button  on the Selection List toolbar. You can move the selected items up or down in the Selection List using the Manual Sorting mode (the buttons on the Selection List toolbar. You can move the selected items up or down in the Selection List using the Manual Sorting mode (the buttons  and and  on the Selection List toolbar). Thus, you can sort the items the way you want it. on the Selection List toolbar). Thus, you can sort the items the way you want it.
|
|
Tips:
|
1. All operations with items in the Selection List are performed virtually, i.e. without automatically saving the changes to the files on your disk.
|
|
Adding Actions
| All operations with mp3 files and other music files are performed with the help of Actions. For example, Actions can be the following:
|
| · | Rename files using the information from tags.
|
| Using Actions, you can change tags for a large or very large list of files. You can first change the data virtually, while the program will save all those changes to files afterwards. You will also be able to make the filenames by the way you want, create playlists and copy the changed files to the folders with your favorite music.
|
| Any Action is added to the Action List by pressing the "Add the Action" button ( ) on the Action List toolbar and selecting the necessary Action from the drop-down menu. Actions can also be added from the main menu of the program. ) on the Action List toolbar and selecting the necessary Action from the drop-down menu. Actions can also be added from the main menu of the program.
|
| The Action List can be edited. Actions can be deleted (the  button on the Action List toolbar), moved along the list (the and buttons on the Action List toolbar). Also you can save the Action List to a file and load the saved lists from files (the and button on the Action List toolbar), moved along the list (the and buttons on the Action List toolbar). Also you can save the Action List to a file and load the saved lists from files (the and  items on the Action List context menu). These options can be accessed from the context menu of the Action List or from the main menu of the program also. items on the Action List context menu). These options can be accessed from the context menu of the Action List or from the main menu of the program also.
|
| It is possible to add some Actions quickly. The "Quickly Add Actions" mode worth mentioning in particular. Using this mode, you can load one of the Actions Sets you have specified by pressing just one button, reading tags from music files is performed before that, if necessary. To do that, press the  button on the Main toolbar or Selection List toolbar. Options available for Quick Adding are enumerated in the drop-down menu to the right of this button. This list can be edited - click to more information... button on the Main toolbar or Selection List toolbar. Options available for Quick Adding are enumerated in the drop-down menu to the right of this button. This list can be edited - click to more information...
|
|
Tips:
|
1. If at addition of Action the Selection List is empty, all items of the chosen folder are added to the Selection List.
|
2. Actions Set can be saved and loaded from files.
|
3. Add the Action "Save the changes" any time when you want to save the made changes while Performing Actions. For example, if you add some tag editing Actions, it will be absolutely logical to add this Action after them. After that you can add Actions generating playlists, etc.
|
|
Edit tags, rename files, create playlist and etc
| After you add the any Action, you can edit the information of the music files in the Selection List.
|
| Will choose the necessary Action in the Action List and edit parameters in a window on the Working Panel. Any changes in input fields are displayed in the Selection List.
|
| The possible methods of reading data from the tags of items in the Selection List into input fields and saving the made changes to files worth mentioning in particular. There are 2 options:
|
| · | Data are read from all items in the Selection List ignoring the selection of the items. Changes made by any Action are applied to all items.
|
| · | Data are read only from the items selected in the Selection List. The changes made by any Action are also applied to the selected items only.
|
|
Tips:
|
1. All operations with items in the Selection List are performed virtually, i.e. without automatically saving the changes to the files on your disk.
|
2. If you want to get the cleared/modified data back, the data from file(s) can be read for the second time. It can be done with the  button on the Working Panel toolbar. button on the Working Panel toolbar.
|
|
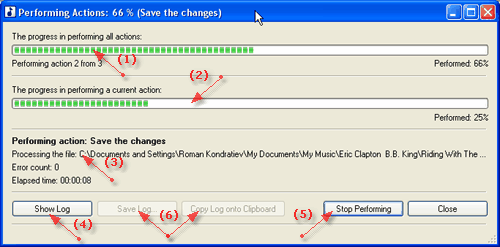
Performing the Actions
| After you add the any action, you can perform the added Actions. While performing the Actions, all the changes you make will be saved to files.
|
| The information about the Action performing process is displayed in the special window:
|
| The button "Show log" opens a detailed log of Actions performing.
|
| It is possible to save results to a log file as well as to perform some operations before or after performing the Actions. These operations can be specified in the program settings.
|
See also:
|